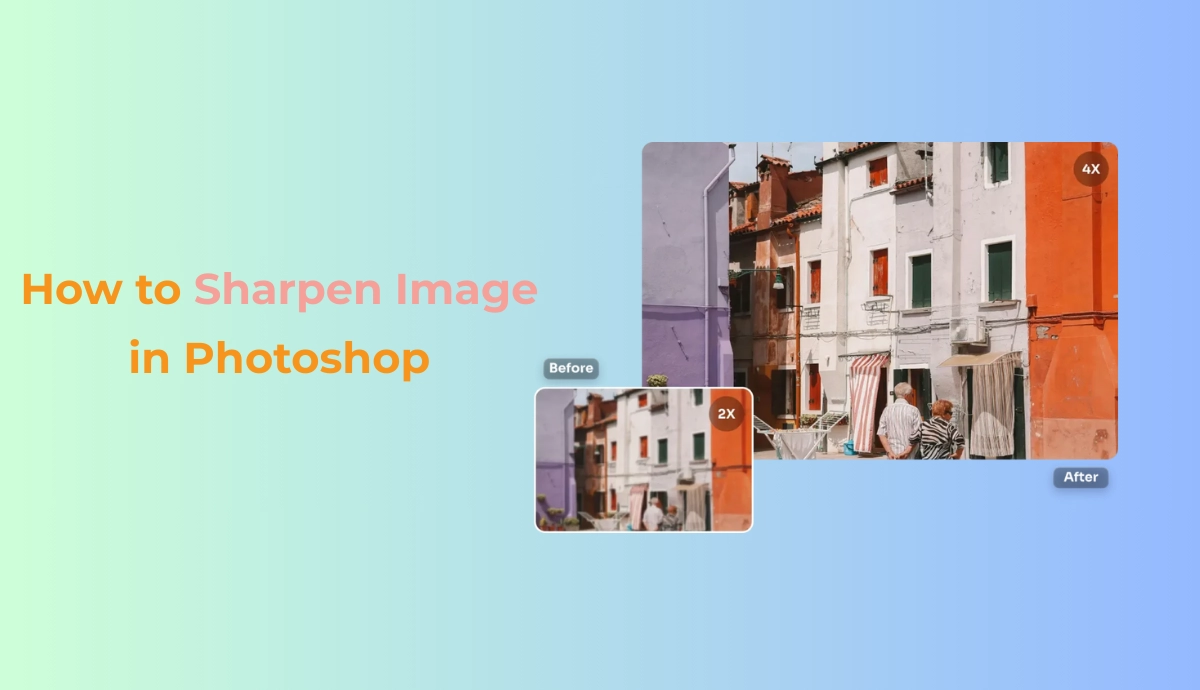
How to Sharpen Image in Photoshop – A Complete Guide
Summary: Have a photo that looks blurry or lacks crisp detail? Don’t worry, Photoshop offers powerful tools to help you bring your images back to life. In this step-by-step guide, you’ll learn how to sharpen an image in Photoshop using proven methods like Smart Sharpen, Unsharp Mask, and High Pass filter. Besides, we will give an excellent alternative for image upscaler – AI Ease. Now, let’s check for that.
Why Image Sharpening Matters?
In digital photography, photos can sometimes look a bit soft or blurry, and sometimes, we need the help of Photoshop to increase picture resolution. Photoshop helps bring back clarity and detail, making your images look more professional, polished, and visually appealing.
What Is Image Sharpening?
Sharpening image is the process of enhancing the edges and fine details in a photo to make it appear clearer and more defined. In Photoshop, sharpening can increase contrast around the edges. Just think of it like adjusting your glasses: the image is already there, but sharpening helps you see it more clearly.
It’s also important to understand why an image might appear soft or blurry in the first place. Here are some key factors that can affect the visual effects.
- Camera shake
- Out-of-focus
- Low-resolution images
- Motion blur
So, how to sharpen image in Photoshop? I will show you some methods that have been proven effective. Let’s try them one by one.
How to Sharpen Image in Photoshop?
Method 1: Use Unsharp Mask
Another great way to sharpen a photo in Photoshop is to use an Unsharp Mask. An Unsharp Mask actually sharpens your photo by increasing the contrast around edges. Here’s a step-by-step guide on how to sharpen an image in Photoshop using an Unsharp Mask.
First, you could duplicate the image layer to ensure non-destructive editing. Just click on the original image layer and press Command/Control + J. With the duplicate layer selected, go to Filter > Sharpen > Unsharp Mask and adjust your settings in the pop-up window.
- Amount: Drag the slider to set the strength of the sharpening.
- Radius: Drag the slider to control how much area around each pixel is affected.
- Threshold: Drag the slider to tell how different pixels need to be before they get sharpened.
Suggested Unsharp Mask Settings for Beginners:
The following values are just for reference. Please set the right value based on your image condition.
| Type of Image | Amount | Radius | Threshold |
| Portrait | 100–120% | 1.0–1.5 px | 2–5 |
| Landscape | 150% | 1.5–2.0 px | 0–3 |
| Web Graphic | 80–100% | 0.5–1.0 px | 0 |
Method 2: Use Smart Sharpen
Smart Sharpen is your best friend if you’re starting and want the easiest and most effective way to sharpen a photo in Photoshop. This tool gives you more control than the basic “Sharpen” filter and is excellent for fixing slightly blurry and soft-looking images.
Here’s a step-by-step guide on how to sharpen an image in Photoshop using Smart Sharpen.
When you finish the duplicate image layer, right-click on the layer in the Layers panel and find the following options to increase photo quality: Filter >Sharpen >Smart Sharpen. A new window will then be prompted, and you need to configure the settings to increase photo resolution.
- Amount: Choose an Amount value to decide how strong the sharpening is.
- Radius: Choose a Radius value to control how many pixels around each edge are affected.
- Reduce Noise: Adjust the Reduce Noise slider to avoid adding grain while sharpening.
Note: Check the Preview button to compare before and after in real time and over-sharpening! If your photo looks harsh or grainy, reduce the Amount or Radius.
Suggested Smart Sharpen Settings for Beginners:
The following values are just for reference. Please set the right value based on your image condition.
| Photo Type | Amount | Radius | Reduce Noise |
| Portraits | 120-150% | 1.0-1.5 px | 5-10% |
| Landscape | 150-200% | 1.5-2.5 px | 0-5% |
| Product Shots | 130-180% | 1.0-2.0 px | 5-10% |
| Low Light/Noisy | 100-130% | 1.0 px | 10-20% |
| Motion Blur Fix | 150-250% | 1.5-3.0 px | 0-5% |
Method 3: Use High Pass Filter
If you’re looking for a creative and flexible way to sharpen your image, especially specific parts like eyes, textures, or edges, the High Pass Filter is a great option. Unlike the other sharpening methods, High Pass can emphasize the edges in your photo and blend them back in with the layer blending modes.
Here’s a step-by-step guide on how to sharpen an image in Photoshop using the High Pass filter.
Just as the above methods, it is recommended to duplicate your image layer and right-click on the duplicated layer to choose Convert to Smart Object. This move can help you re-edit the effect later. After the selection, click Filter > Other > High Pass and adjust your Radius slider in the High Pass dialog box.
After that, blend the sharp edges back into the image. There are two blend models of the High Pass layer:
- Overlay – stronger effect
- Soft Light – gentler result
Method 4: Use Camera Raw Filter
The Camera Raw Filter in Photoshop is a powerful tool for editing RAW photos. Its easy-to-use slider allows you to control the sharpness and detail.
Here’s a step-by-step guide on how to sharpen an image in Photoshop using Camera Raw Filter.
- Open your image in Photoshop and right-click on your image layer to choose Convert to Smart Object.
- Go to the top menu and click Filter > Camera Raw Filter.
- Click the Detail icon and move the slider to set the configuration under the Sharpening section.
There are four main sliders under the Sharpening section, and you can check the suggested value for beginners.
The Amount and Radius have the same meaning as we explained above, and it is recommended to set the Amount value to 50-100 and the Radius value to 1.0–1.5 px.
Detail: Sharpens fine textures. Higher values may add noise. The suggested value is set at 25–50.
Masking: Sharpens only edges and protects smoother areas. It is recommended to set the value at 50–80.
How to Sharpen Image in Photoshop with AI Ease?
Still think the steps to increase picture resolution are troublesome? Try AI Ease and you will get a faster, smarter, and hands-free way to sharpen images. You don’t need to open Photoshop at all and our AI-powered photo enhancer lets you automatically sharpen images online in seconds. It uses advanced machine learning to detect edges, restore clarity, and enhance textures with one click.
- One-click image sharpening
- Smart edge detection
- Works with any image format
- No complex skills required

Now, click the button and try AI Ease to sharpen your photos the smart way!
Step 1: Upload your image to AI Ease by dragging or dropping your image.
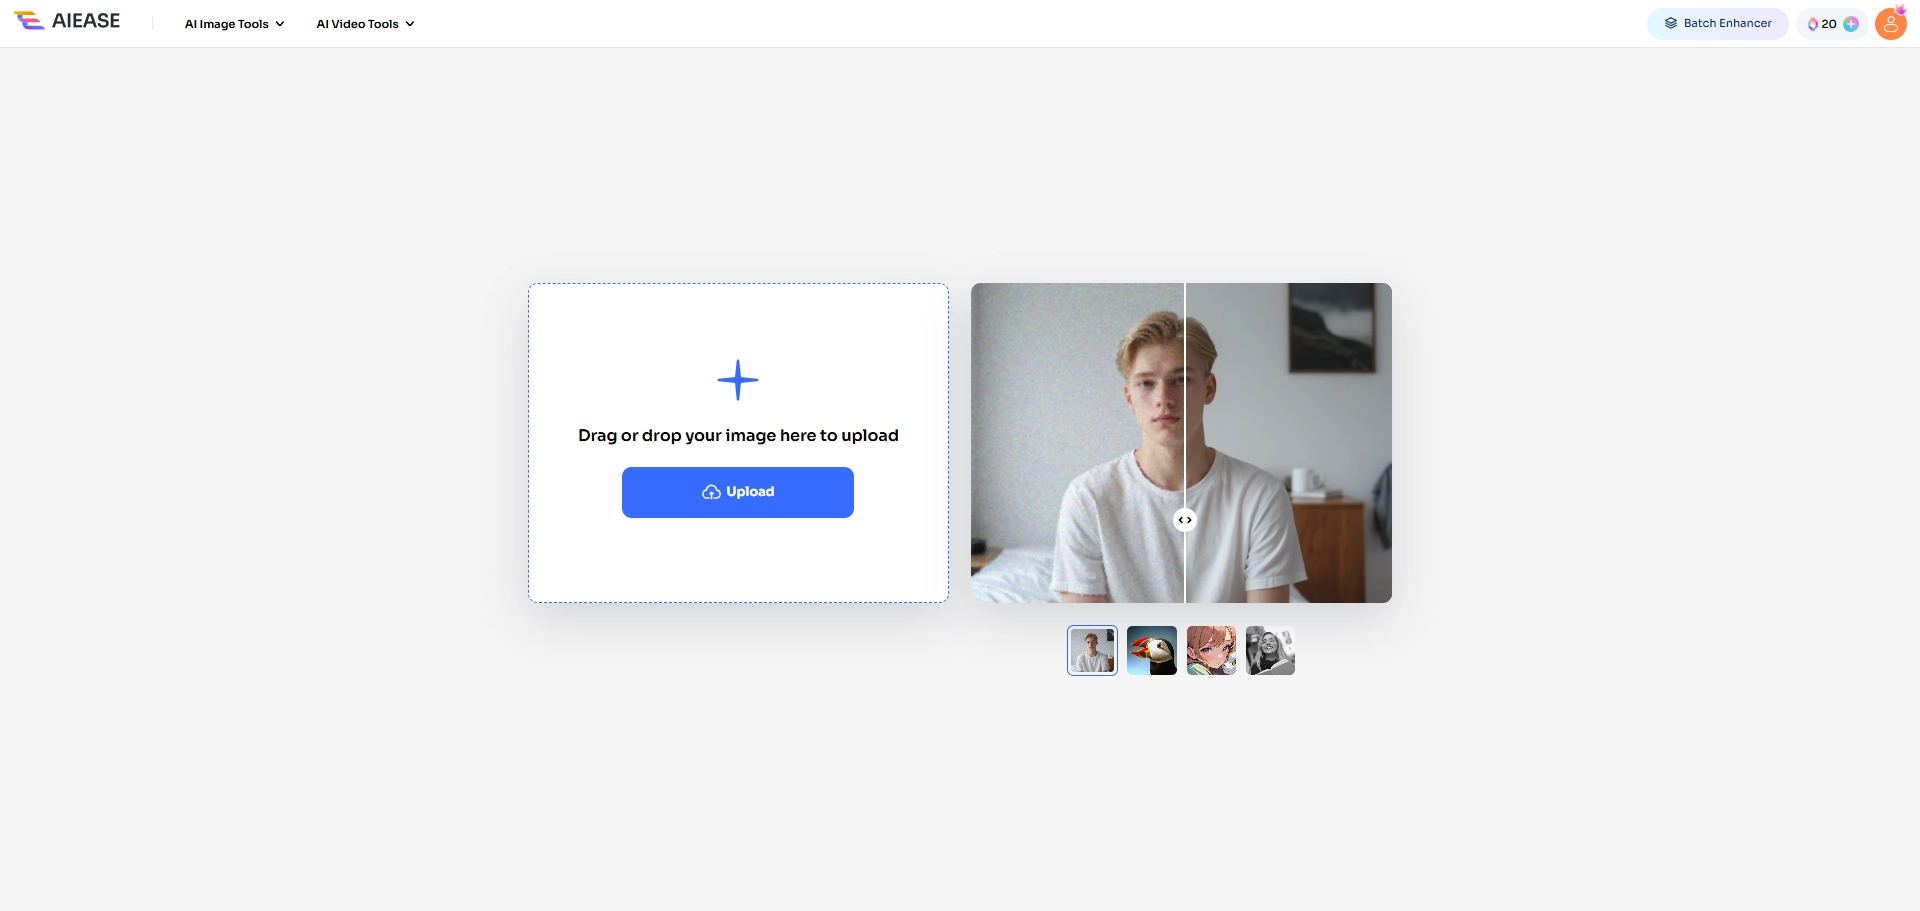
Step 2: AI Ease will automatically detect and enhance your photo in seconds.
Step 3: Then you can download and share the photo.
Note: AI Ease also provides a video enhancer to improve video quality automatically. With AI Ease video enhancer, you can effortlessly enhance video quality and transform low-quality videos into stunning visuals with just one click.
How to Sharpen an Image in Photoshop FAQ
There isn’t much difference between the Smart Sharpen and the Unsharp Mask, but in comparison, the Smart Sharpen increases the contrast to produce exaggerated artifacts.
The above contents have introduced how to sharpen an image in Photoshop. You can also use the above techniques to sharpen a blurry picture, including Unsharp Mask, Smart Sharpen, and AI Ease. We recommend AI Ease because it automatically increases the image’s resolution.
You can use a layer mask and a soft brush to sharpen only certain parts (like eyes in a portrait).
Conclusion
Sharpening an image in Photoshop might seem like a small step, but it can make a big difference in your final result. Whether you choose Smart Sharpen for precision, Unsharp Mask for speed, or the High Pass technique for more creative control, each method has its place in your editing workflow.
Remember to always work on duplicate layers or smart objects to preserve your original file, and don’t be afraid to fine-tune settings for different types of images. With a little practice, you’ll turn dull, blurry photos into sharp and stunning visuals in just a few clicks. If you pursue an easier method to sharpen the image, try AI Ease! It will upscale your image automatically.