How to Remove an Object in Photoshop: Step-by-Step Guide
Summary: Learn how to remove an object in Photoshop using tools like Content-Aware Fill, Clone Stamp, Healing Brush, and Patch Tool. This step-by-step guide covers beginner-friendly methods to clean up photos, fix distractions, and create polished images with ease.
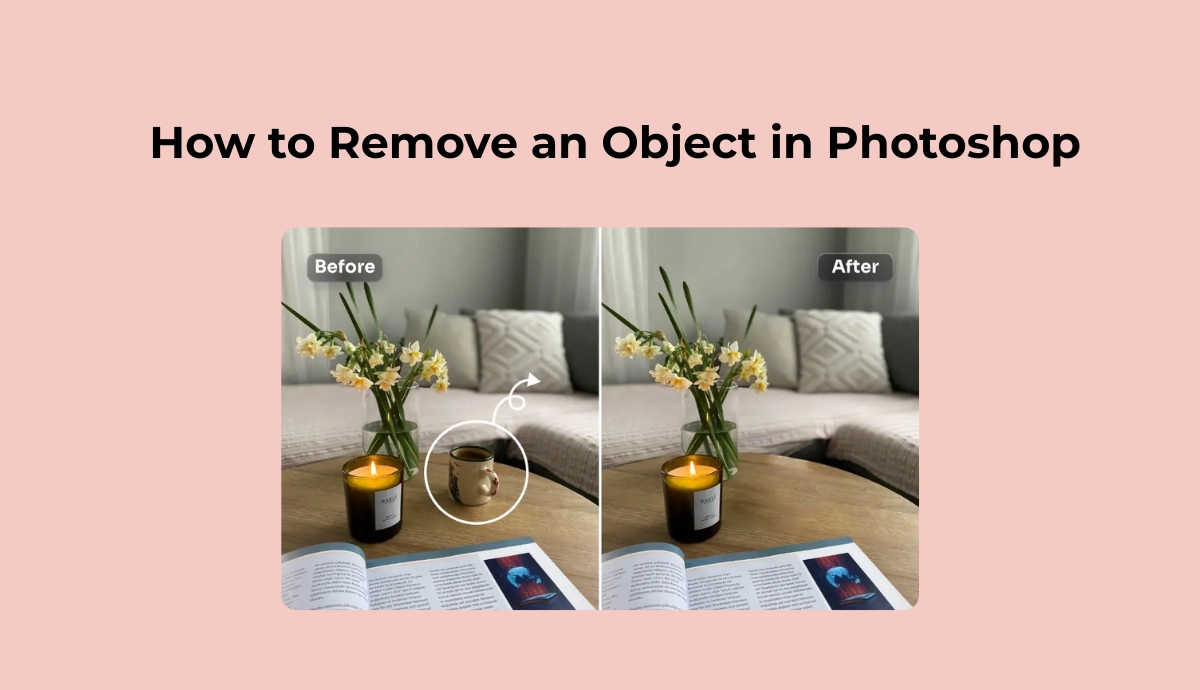
Photoshop has long been the go-to tool for professional photo editing, and one of its most powerful capabilities is object removal. Whether you want to erase tourists in the background of a travel photo or delete an unwanted sign in a landscape photo, removing unwanted elements through Photoshop can greatly improve the effect of the photo.
So, how do you remove objects in Photoshop? This guide is designed to help you do just that. We’ll explain it in clear step-by-step instructions suitable for beginners and intermediate users.
In this tutorial, you’ll learn multiple methods to remove objects in Photoshop:
- Content-Aware Fill for quick background matching, like a smooth sky or wall
- Clone Stamp Tool for precision-level edits, like a complex background
- Healing Brushes for smooth blending, like facial blemishes or small marks
- Patch Tool for pattern-sensitive areas
Each method has its advantages depending on the complexity of the background and the precision required. You can combine techniques for better results, and Photoshop also allows you to always work on a duplicate layer to preserve the original image.
The whole process is very simple. With practice, you can make removing objects an integral part of your editing workflow and an effective way to make images sharper and more focused. No matter what your skill level is, you’ll find a method that fits your editing needs and helps you achieve seamless, natural-looking results.
Why Remove Objects in Photoshop?
Removing unwanted objects in Photoshop doesn’t have to be complicated. To help you better clean up images, Photoshop offers multiple tools to give you full control over your edits. Here are some real use cases when you need to remove objects:
Travel Photos
Many of you may encounter such a problem – You’ve finally captured that perfect shot in front of a famous landmark, but a group of tourists wandered into your frame. It’s sad, right? Now, instead of discarding the photo, use Photoshop’s Content-Aware Fill or Clone Stamp Tool to remove the distractions, which can make it look like you had the place all to yourself.
Fotografia del prodotto
Perfect for people who want to list products on the web or run an online store. Whatever your product photography is used for, unwanted elements like dust, reflections, cords, or even your own reflection can ruin a shot. With Photoshop, you can remove background clutter and ensure your product is the star of the image.
Portrait Editing
A great portrait can be ruined by a stray hair, a skin blemish, or even an awkward background object. Tools like the Spot Healing Brush allow you to subtly clean up facial imperfections or background noise, making the subject shine without looking overly retouched.
Social Media Posts
You’re about to post the perfect picture or selfie until you notice some unwanted elements in the background. Use Content-Aware Fill to remove accidental photobombers and maintain the aesthetic of your feed.
Vintage Photo Restoration
Old family photos may be scratched, torn, or faded. Photoshop’s Healing Tools can help restore old photos and repair those flaws, such as cracks, stains, or even missing parts of an image, while preserving the photo’s original character.
How to Remove an Object in Photoshop? Easy Guide
| Metodo | Best For (User Type) | When to Use | Strengths | Limitations |
| Content-Aware Fill | Beginners & Intermediate users | When the background is simple and consistent | Fast, automated, minimal manual work; good for quick fixes | May generate unnatural results in complex or textured areas |
| Clone Stamp Tool | Intermediate to Advanced users | When you need precise edits | Full manual control; perfect for pattern matching | Time-consuming and requires skill to blend seamlessly |
| Spot Healing Brush | Beginners | For small, isolated flaws like skin blemishes, dust spots, or tiny objects | One-click fix; great for portraits or minor edits | Not suitable for large or complex object removal |
| Healing Brush Tool | Intermediate users | When you want to remove objects with texture blending, like skin, fabrics | Allows sampling from a source; good texture integration | Requires more control than spot healing; not ideal for solid backgrounds |
| Patch Tool | Intermediate to Advanced users | When you want to replace a selection with a cleaner area of your choice | Maintains texture and lighting; useful for uneven surfaces | Less flexible in tight spaces; may need further cleanup with other tools |
| AI-Powered Tools | Beginners or users who want fast, no-skill solutions | When you want to remove objects instantly without manual editing | Extremely fast, user-friendly, no Photoshop skills required | Ideal for quick results, not high-end edits |
Of course! You can also use multiple tools in combination, which facilitates better erasing objects with a flawless background.
Before you start trying these tools to eliminate the unwanted objects in your images, here are some tips to help you get the best results:
- Start with a new layer.
- Use small, incremental strokes for complex areas if needed.
- Experiment with different modes.
- Use keyboard shortcuts and the related button will be marked inside the brackets.
Tool 1: Content-Aware Fill
How to remove an object in photoshop with generative fill? Try this one – Photoshop object eraser. It can automatically fill a selected object area by blending it with the surrounding background, using AI to match texture and lighting. If you want a fast, one-step object removal, try Content-Aware Fill Photoshop, which is perfect to eliminate the unwanted objects from a simple background, such as skies, grass, walls, or pavement. Content-Aware Fill is a good way to remove an object in photoshop with AI.
Guida passo passo:
- Open your image in Photoshop and duplicate the background layer.
- Use the Lasso Tool (L) or Object Selection Tool (W) to select the object.
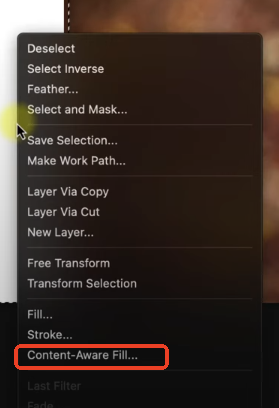
- Go to Edit and then Content-Aware Fill, which analyzes the pixels surrounding the selected area.
- In the workspace, adjust the Sampling Area if needed.
- Preview the result and click OK.
- Use the Spot Healing Brush or Clone Stamp Tool to refine any rough edges if needed.
Tool 2: Clone Stamp Tool
How to remove an object in Photoshop and replace with background? Photoshop Clone Stamp tool can manually copy pixels from one part of the image to another, offering full control for precision editing. When removing objects from textured backgrounds, like bricks, wood, or tiles, the Clone Stamp tool is a good choice.
Guida passo passo:
- Select the Clone Stamp Tool (S) from the toolbar.
- Adjust the brush size, hardness, and opacity from the top menu.
- Hold Alt for Windows users or Option for Mac users and click on the source area to sample.
- Paint over the object you want to remove.
- Resample frequently to maintain a natural texture blend.
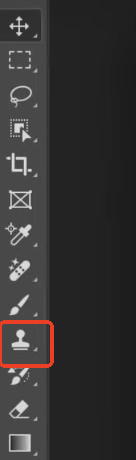
Tool 3: Spot Healing Brush Tool
The Photoshop Spot Healing Brush Tool works quite well on erasing imperfections from photos, like blemishes, dust, or small objects. By automatically sampling surrounding pixels, it works to blend and replace the unwanted area, making the edit seamless. It’s an ideal method for skin retouching, dust removal, or erasing tiny distractions.
Guida passo passo:
- Select the Spot Healing Brush Tool (J).
- Set the brush size just larger than the object you want to remove. You can also customize the brush hardness and other settings in the tool options bar.
- Make sure the Type is set to “Content-Aware” for automatic blending. If “Content-Aware” isn’t producing the desired result, try “Proximity Match” or “Create Texture” for different blending effects.
- Click or drag over the unwanted object. Photoshop will automatically sample and blend the surrounding pixels.
- Repeat or refine as needed.
Tool 4: Healing Brush Tool
The Healing Brush Tool is commonly seen in image editing software like Photoshop. People usually use it to blend the sampled texture of the source area with the color tones of the target area to get a more natural correction effect. If you’re more concerned with texture matching, such as repairing fabric creases, removing facial scars, or cleaning surfaces, try this tool!

Features of Healing Brush Tool:
- Sampling + Blending
- Matching Texture, Transparency, Lighting, and Shading
- Brush Size and Hardness
- Content-Aware
Guida passo passo:
- Select the Healing Brush Tool.
- Alt/Option + click on a clean area to sample.
- Paint over the object or blemish.
- Adjust brush hardness and spacing for smoother blending.
Tips to use this object eraser:
- Start with a small brush size
- Sample carefully
- Use multiple samples
- Use content-aware mode if available
- Adjust brush settings
Tool 5: Patch Tool
The Patch tool allows you to replace a selected area with another part of the image, maintaining texture and tone. It could be a good choice when removing medium-sized objects surrounded by similar textures (grass, walls, fabric).
Guida passo passo:
- Choose the Patch Tool (J) from the toolbar.
- Draw a selection around the object to be removed.
- Drag the selection to a clean area you’d like to use as a replacement.
- Release the mouse and let Photoshop blend the new area.
- Deselect and touch up edges if needed.
How to Remove an Object from a Picture?
While Photoshop gives you full control for professional edits, sometimes you just need a faster, smarter solution, especially if you’re not a trained designer. That’s where AI Ease comes in.
With AI Ease’s rimuovi oggetti, you can remove any unwanted objects from your picture in just a few seconds. No selection tools, no brushes, no layers – just upload your image, highlight what you want to remove, and let the AI handle the rest. It’s perfect for creators, marketers, or anyone who needs clean, polished visuals without the Photoshop learning curve.
Step 1: Click the button to enter the AI Ease AI-powered object remover.
Step 2: Upload the image that you want to remove unwanted objects from.
Step 3: Use our brush tool to mark the object you want to get rid of.
Step 4: Click “Remove,” and our tool will automatically clean up your marked objects in the image.
Step 5: Preview and download the picture.

Conclusione
How to remove an object in Photoshop? It doesn’t have to be complicated. Whether you’re using Photoshop tools like Content-Aware Fill or Clone Stamp for precision edits or looking for a faster solution, there’s a method that fits your needs.
If you want a quick, beginner-friendly way to clean up your images, give AI Ease a try. It’s fast, simple, and requires no editing skills — just upload your photo and let the AI do the work.